Changing Eye Color in Adobe Photoshop Creative Cloud – CC or CS6
Tutorial Details
Difficulty: Intermediate
Estimated Time: 5 – 10 minutes
In this tutorial we’ll show you how to change eye color in Adobe Photoshop CS6. There are many different ways to change eye color and we will explore just one of the techniques that gives the most reliable color changes whilst maintaining a more precise element of control of color variations. The technique can also be applied to various other objects and used for a multitude of purposes.
What you’ll need:
- A ready to go image file
- Photoshop CS5+
Optional
- A graphic tablet – (we recommend this one)
TIP: Click on the images in the following tutorial to see a larger version.
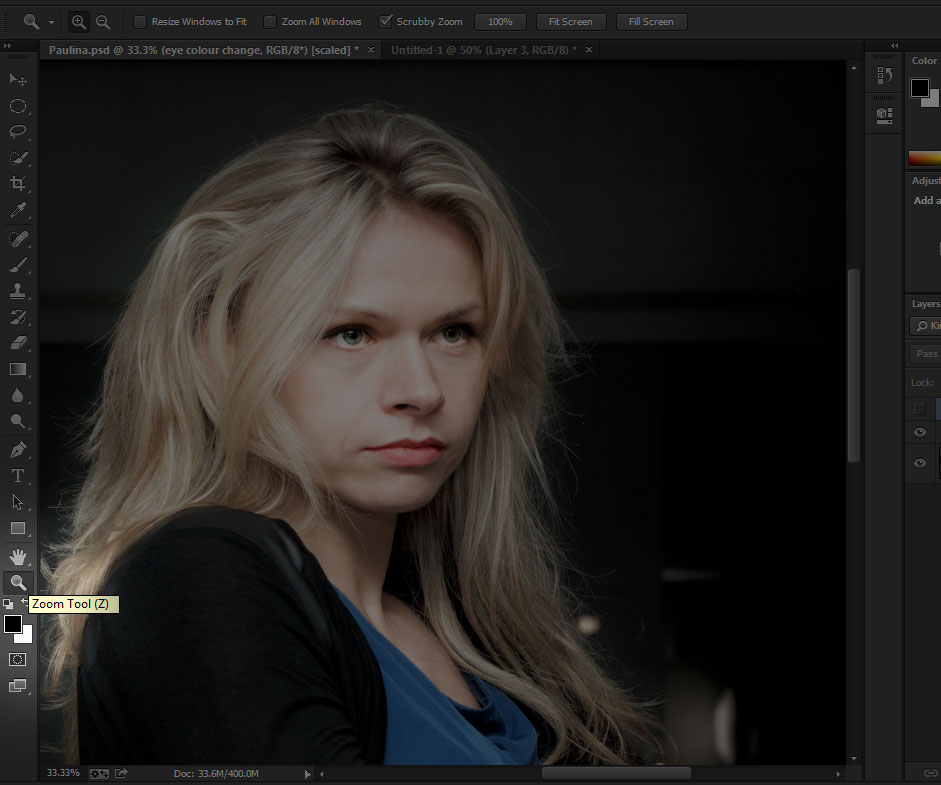
Before starting we need to prepare the image. The solution I will be showing is detail orientated and will require zooming in on the eyes to as much as 400% to get pixel perfect color changes (depending on your image size). To access the zoom tool you can either:
- locate it on the Tool palette
- press “z” to select the tool and click and drag a selection across the eyes
- hold down “ctrl +”(Windows) or “cmd +”(Mac)
Once both eyes are filling the screen we can now move onto the next step.
#1 Selecting the Eyes using the Quick Selection Tool
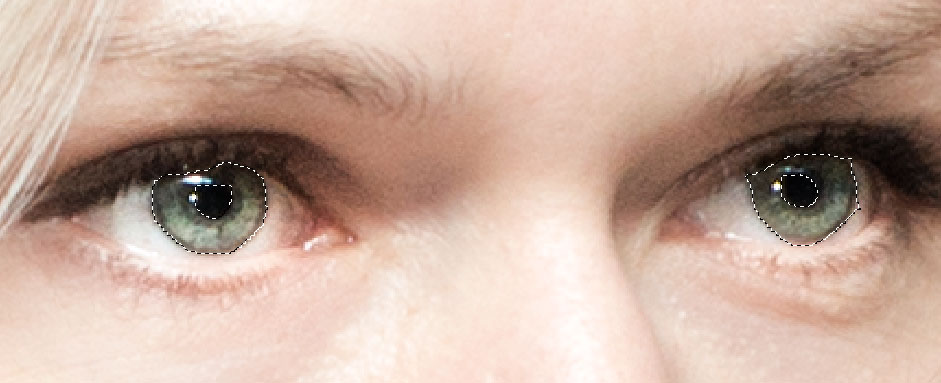
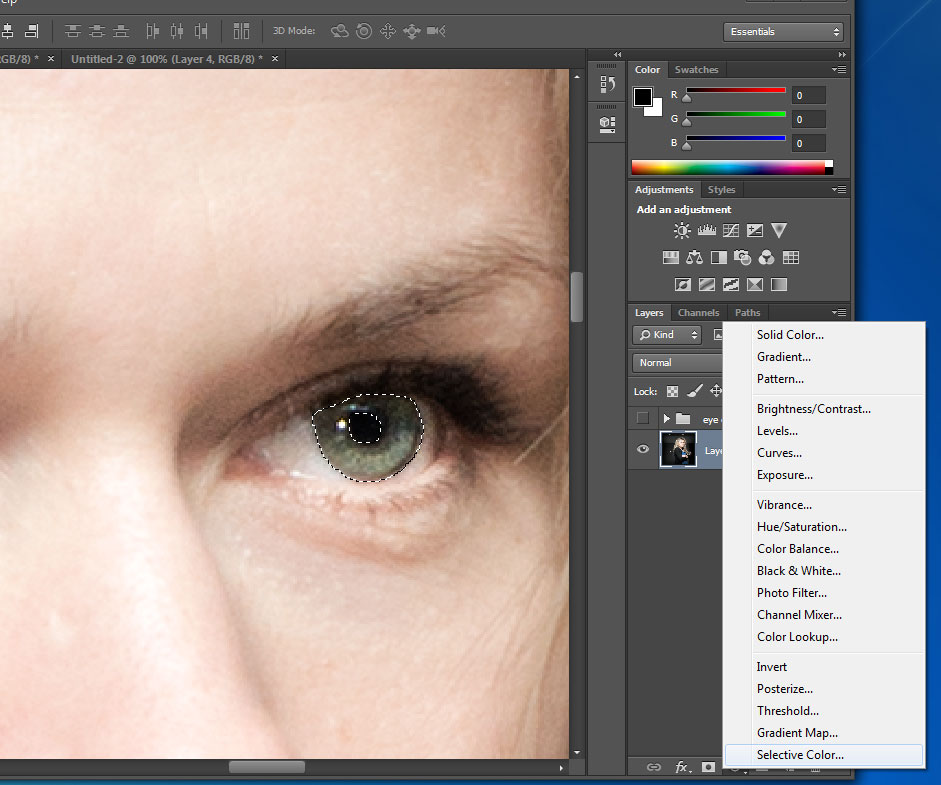
The purpose of selecting the eyes using the Quick Selection Tool is to make sure we don’t effect the color of the rest of the image. Any changes we make will be isolated to the eyes only.
How to access the Quick Selection Tool
Click and hold down on the magic wand tool and a secondary menu will appear with alternative tools, select the quick selection tool from here.
Using the Quick Selection Tool, click and drag over the irises – don’t worry about being too precise at this moment, cleaning up comes later. Just make sure that the majority of it is selected.
TIP: Hold down the alt/option key whilst dragging to unselect any areas you don’t want to include, this includes the whites of the eyes and the pupils.
#2 The Refine Edge Tool
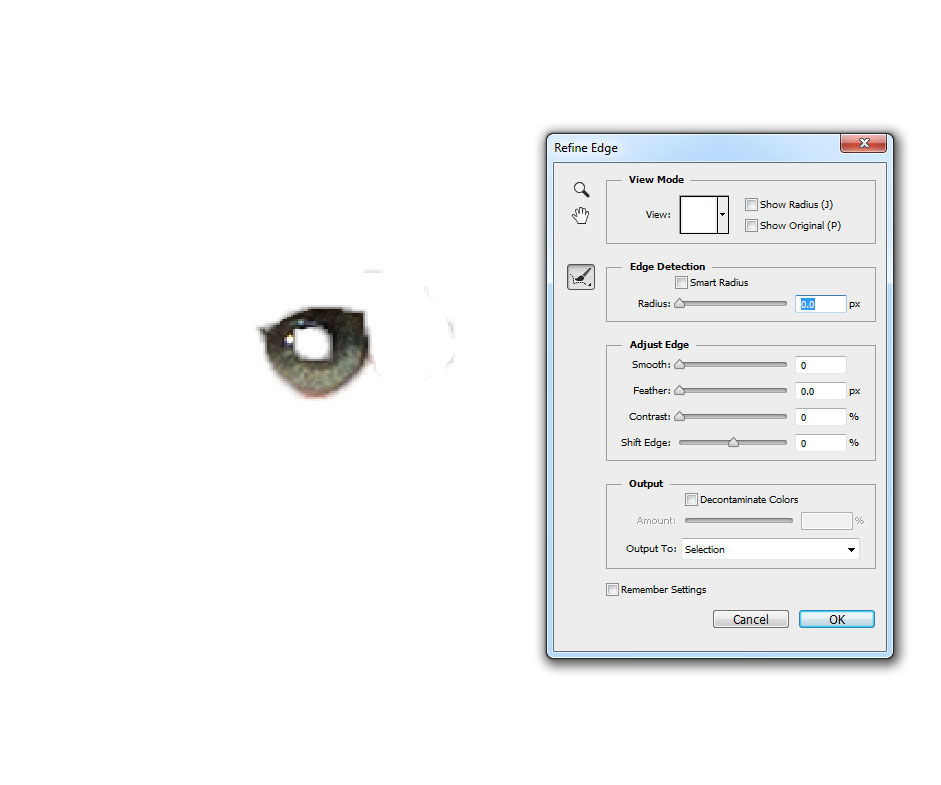
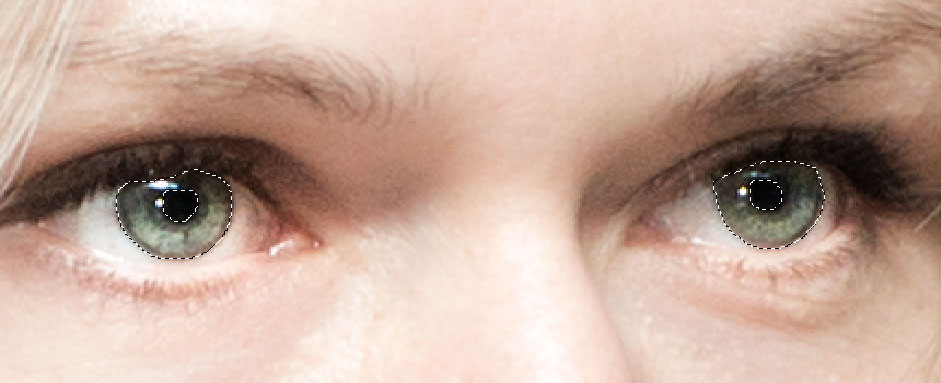
The purpose of the refine edge tool is so that we can clean up the selection. Using this we can harden or soften the edges, reduce the edges and perform smart selections.
How to access the Refine Edge Tool
When you have any of the selection tools selected (including the quick selection tool) then along the top menu you will see the Refine Edge button. Click this.
A new dialogue box will open and a variety of options are now available that will allow us to clean up the selection.
Smart Radius – This value allows you to increase the border of the selection for fine details like hair etc whilst not selecting broader areas like the background. Adjust the radius to suit your image (larger images which have more pixels tend to require a higher radius).
The brush tool should be automatically selected within the Refine Edge dialogue box. Click and drag over the edges of the hair to allow photoshop to generate a better selection of the edges which are more natural. 
At this point you can start being as precise as needed. It’s possible to go back and redo the refine selection as many times as needed to get the precision required. Once done click OK. (For the purpose of this demonstration I have kept the selection fairly simple).
#3 Layer Adjustments – Selective Color
We’ve now reached the stage where we can start changing the color. Firstly, unlike most other tutorials, we don’t just color over the original layer as that type of retouching is destructive by removing all the original detail which can cause problems later on. That type of process is not recommended for any type of retouching.
The process we are about to go through is considered non-destructive as it alters the image without removing the original detail.
Firstly we will be using a layer adjustment. Layer adjustments are layers that alter layers beneath them in a specific way. The area of adjustment is altered by the mask. Masking is a form of hiding part of a layer without using the eraser. The benefits of using a mask over an eraser is you can hide or unhide that selection which allows further refinement and is also a non-destructive process. Masks use the colors black and white as 100% invisible and 100% visible with different shades of grey in between to indicate different levels of transparency.
How to create the Selective Color adjustment layer.
Seeing as we have already selected the eyes all we need to do is create a new Selective Color layer adjustment which we can find under Layer – New Adjustment Layer. Selective Color can be found at the bottom.
Selective Color is the process that will allow us to manipulate the existing colors in a highly controlled manner.
#4 A bit of Color Theory – Whites, Neutrals and Blacks
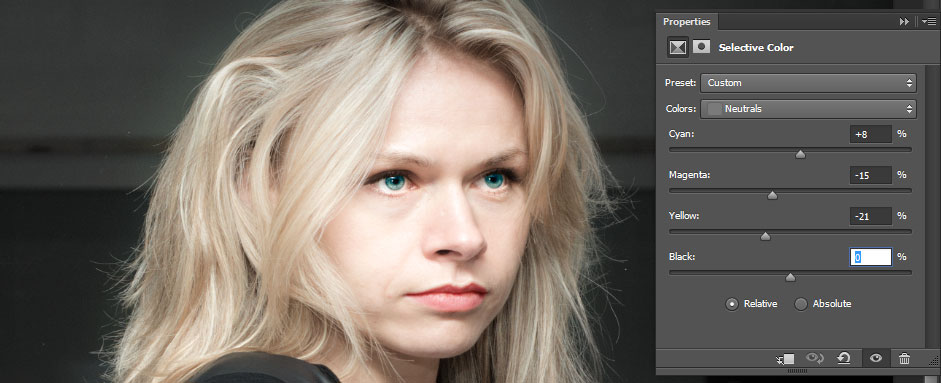
For the purpose of this tutorial I will only be referring to the whites, neutrals and blacks. Whites can be considered the highlights and lighter sections of the image, Neutrals the mid tones and Blacks the darker tones (or shadows).
Firstly we will manipulate the neutral tones as this will effect the standard eye color range in the most notable way. For extremely light eyes modifying the Whites will have the greatest impact on changing the eye color. At the other end, for extremely dark eyes, modifying the Blacks will have the greatest impact. In both cases the selection will have to be very refined and may require several rounds of alteration.
To alter the selection further you just need to select the mask on the layer adjustment by clicking on the mask thumbnail. You will know it is selected as there will be a white highlight border around it. From there you can use the brush tool or enter back into the refine edge tool to clean up further. Reducing the brush opacity will help create graduating shades of grey (levels of transparency) to create softer edges.
Note – Images are naturally not sharp and quite blurry. The key to good photo-retouching is to make sure the areas retouched match the rest of the image in terms of softness.
To make sure your selected mask colors are 100% black and white press “D” which will reset your palette. The foreground color will be the active color but you can switch it by using the shortcut “x”.
When you select either Whites, Neutrals or Blacks the following sliders will be available to modify:
- Cyan
- Magenta
- Yellow
- Blacks
Moving the slider to the left will reduce the slider color present in the selection.
Example: moving the Cyan slider to the left will reduce the amount of cyan present in the selection.
When reducing the amount of a color, it’s contrasting color will become more noticeable. Reducing or increasing a color too much is not advisable as whilst this method is non-destructive it cannot create detail that does not exist. This leads to fake looking images and reduces the overall effect.
Important Reminder:
You cannot create detail that does not exist using adjustments – at that point you switch from photo-manipulation to digital art.
Red Eyes
By decreasing cyan you will be removing the blue hues from the selection which will increase the red hues in the selection. When combined with increasing magenta and yellow the output will be a strong red.
Turquoise Eyes
By increasing the cyan you will be increasing the blue hues in the selection and when the magenta is decreased further (to pull out the blues) and the yellow decreased (which will reduce the intense green) then you’ll end up with a stronger color that can be considered almost unrealistic. To tame the vibrancy down we can lighten the mid-tones slightly by decreasing the blacks.
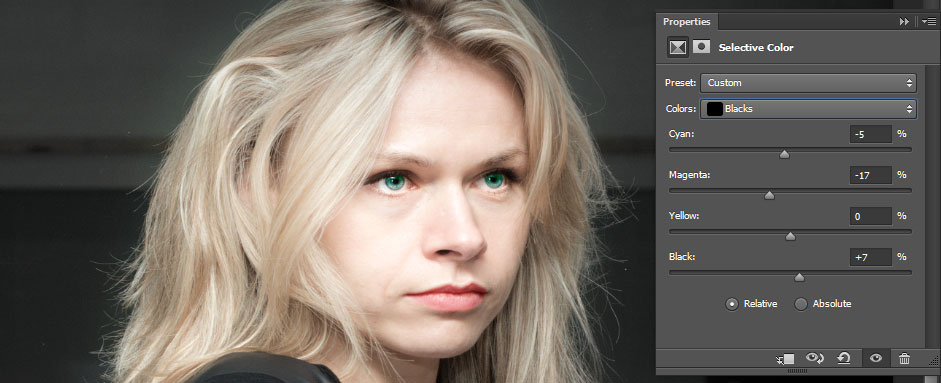
Green Eyes
Using the Turquoise Tutorial as a base I now change from Neutrals under “Color” in the adjustments panel to Blacks. By decreasing the cyan you will be increasing the red hues in the shadows which should bring out a browner color. A slight increase in magenta will enrich the brown. Then by pushing the yellow up we’ll be bringing out the stronger greens in between the hair strands. To give it more depth we’ll increase the blacks so that its level with the yellow.
Conclusion
In this tutorial we’ve learned:
How to change eye color in Adobe Photoshop CS6
- How to use a mask
- How to use the selective color adjustment layer
- How to refine the edges of a selection
- I hope you have found the tutorial helpful. Feel free to comment below, share this tutorial and subscribe to our Youtube Channel.

